Global: Embosser Setup: General
When you select New or Modify from the Global: Embosser Setup dialog, you are presented with the following dialog. It usually contains three tabs: General, Device Settings, and Advanced, with an optional fourth tab for specific embosser models.
The General tab is the best place to begin configuring a new embosser.
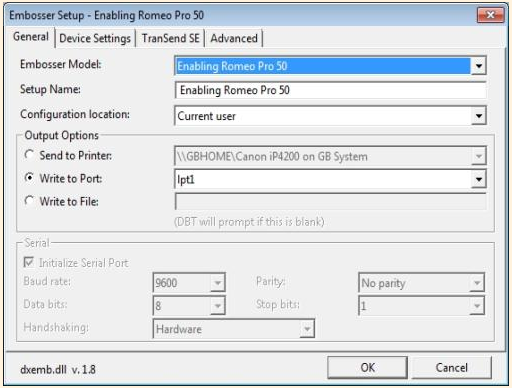
Embosser Model: This drop-down list contains an alphabetic listing of all supported makes and models of braille embosser. Note, however, that Generic embossers are at the top of the list.
If your embosser is not listed, then select "Generic" if your embosser embosses on just one side of the page. If it embosses on both sides of the page, select "Generic Interpoint".
Setup Name: If you leave this field blank,
Configuration Location: A drop down list with two choices, (a) The current user, or (b) All users of this computer.
Network administrators should be aware that "Current User" essentially stores this configuration on the User's Profile. Hence care should be taken if Roving Profiles are in use. Otherwise, if you are setting up a model installation for replication throughout a network using a network installation image, then you should set the Configuration Location to "All users of this computer". The installer supports automatic migration of embosser configurations set this way, using a network installation image.
Output Options - Here you select one of three output methods.
- Send to Printer: If you have installed your braille embosser as a Windows Device or to use a Windows driver, you should normally find it listed here as a "printer". (Hint: You can use this option only if your braille embosser shows up among the printers in the Windows Printer Control Panel.)
- Write to Port: If your embosser is not listed above, you may select a Parallel Port
- Write to File: There are occasions when you may wish to send embossing output to a file. Though you have the option to specify a path and file name, normally you should leave this field blank, in which case you will be prompted for a file name each time you emboss using this setup. You should be aware that if you specify a file name, the file will be overwritten each time without prompting, therefore you should only specify a file name in exceptional circumstances.
Serial - This section is enabled only if you have selected a Serial (com#) device. (This is an older interface that is now not commonly used.) Enter the parameters for Baud Rate, Parity, Data Bits and Stop Bits and Handshaking as required.
If you are using a Serial device, please consult your device manual or supplier for the correct settings.
After completing your work on the General tab, it may be necessary to visit the Device Settings tab as well.