CAUTION The presence of any liquid on or in the unit can ruin the electronics, and may cause electrical shock.
Batteries may need to be recharged because storage capacity of battery is decreased in cold temperatures.
WARNING: THIS MACHINE MUST BE TURNED OFF BEFORE PLUGGING IN THE CHARGER OR SERIOUS DAMAGE MAY RESULT.
FCC RADIO FREQUENCY INTERFERENCE STATEMENT
This equipment generates and uses radio frequency energy and if not installed and used properly, that is, in strict accordance with the manufacturers instructions, may cause interference to radio and television reception. It has been type tested and found to comply with the limits for a Class B computing device in accordance with the specifications in Subpart J of Part 15 of FCC Rules, which are designed to provide reasonable protection against such interference in a residential installation. However, there is no guarantee that interference will not occur in a particular installation. If this equipment does cause interference to radio or television reception, which can be determined by turning the equipment off and on, the user is encouraged to try to correct the interference by one or more of the following measures
If necessary, the user should consult the dealer or an experienced radio/television technician for additional suggestions. The user may find the following booklet prepared by the Federal Communications Commission helpful
"How to Identify and Resolve Radio-TV Interference Problems." This book is available from the US Government Printing Office, Washington, D.C., 20402, Stock No. 004-000-00345-4.
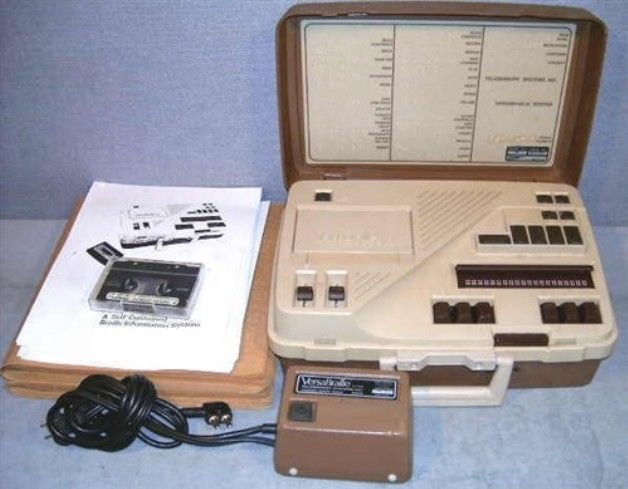
TeleSensory Systems, Inc. is proud to present the VersaBraille (TM) system. The latest progress in electronic technology has made this device one of the most significant advances in the history of braille use. As you learn about the operations of the VersaBraille system and the many powerful functions it contains, we think you will be both impressed and pleased.
This manual is a step-by-step guide that should allow you to learn all of the VersaBraille functions without additional training. Although it may be possible to master VersaBraille operation by skipping from place to place in the manual, the best results will be obtained by carefully following the manual page by page.
From the start, it would be advisable for you to keep in mind that the VersaBraille system allows you to organize information like a book with a table of contents, chapters, pages, and paragraphs. This logical method of information organization has been adopted since most people are familiar with the book concept. If you keep the book concept in mind, it will be easier for you to understand the instructions.
Additionally, you should also keep in mind the concept of "chording." Chording is a term we use to describe the simultaneous pressing and releasing of braille keys with the space bar. An example of chording would be pressing and releasing dot 5 and the space bar at the same time. Chording will enable you to instruct the VersaBraille system directly from the braille keyboard. Specific chording procedures will be discussed as you progress through the manual.
One final note of caution before you begin. The VersaBraille electronic keyboard has been designed to respond to a light touch. You may actually damage the keyboard if you apply the same writing force as with mechanical braille writing devices. The advance bar, located just beyond the braille display, can also be activated with a light touch.
If, at any time, you accidentally bump the advance bar and become confused with the information on the braille display, simply press the eject button and start over again. No information will be lost if this process is followed.
For your quick reference, the various functions of the VersaBraille system are reviewed on print page 25 of this owner's manual. The opposite side, page 26, contains System Prompts and Audio Signals. This is a tear-off page that can be posted near your VersaBraille unit work area and used for reference until all functions are learned.
The shipping carton, foam spacers, and inner box must be saved and stored. When sending back to be repaired, the VersaBraille unit should only be shipped in the complete shipping package. The customer is responsible for damage to the unit through improper packing when shipped.
At this time, locate the first parts of the machine that you will be using. They are the tape deck, the braille keys, the braille line (display), and the advance bar.
The tape deck cover is on the top surface of the VersaBraille unit, on the left side. Although it is closed now, it will later open automatically when the power is turned on.
The six braille keys and the space bar are at the right front edge of the machine, closest to you. The keys are electronic and are sensitive to a much lighter touch than mechanical braille writing keys. The space bar is lower than on a mechanical braille writer and is designed to be operated with your thumb. Examine the keyboard and try out the keys, noticing the light touch needed to make them work.
The 20-cell braille line is at your fingertips, just behind the braille keyboard. Locate the line and notice that when the power is off, all the dots are raised slightly.
Along the upper edge of the braille line is the text advance control. It is a bar extending along the full length of the braille line. The best way to operate this "advance bar" is to tap it with a quick motion. It will make a slight clicking sound each time it is tapped.
Be certain of the location of the advance bar and its operation before continuing. Since the advance bar is quite sensitive and since it is used for a number of functions, it will be most important to avoid accidentally bumping the advance bar while you are learning to operate the VersaBraille system.
Since the batteries of the VersaBraille unit may be discharged after shipping, the battery charger/AC adaptor should be connected before the unit is turned on.
For the best care of your VersaBraille unit, always turn the power on AFTER making all electrical connections; turn the power off BEFORE disconnecting plugs. The on/off switch is a "rocker" switch. Press the left side of this switch to turn the VersaBraille unit on. The tape cover will automatically open, and the braille line will display the word "ready." Do not close the tape cover. If the tape cover is closed by mistake, turn the machine off and on again, and the cover will reopen.
NOTE. Every cassette that you would like to use for writing braille must be a high quality C-60 tape and must first be prepared in the following manner:
With the VersaBraille system, braille is written onto a cassette tape instead of paper, and the braille can then be read on the 20-cell braille display.
Throughout these exercises, it may be helpful to think of a VersaBraille system cassette tape as similar to a typical book. Both contain a table of contents and varying numbers of chapters, pages, and paragraphs.
A brand-new tape must be divided into pages before braille can be written on it. This "formatting" process is simple because the VersaBraille unit does it automatically. Electronic signals will be recorded on the tape, dividing it into page-sized sections that each contain space for 1,000 braille cells. Braille can only be written on tapes that have been prepared in this way. Each side of a tape must be formatted separately.
When using the manual, it is always advisable to read each section completely before beginning. Try this technique before you actually begin the formatting process:
When the unit is finished marking the pages on one side of the tape, it will rewind and eject the tape automatically.
If you wish to write braille on the second side also turn the tape over and repeat steps 2-5 above. This may be done at any time. However, it is not necessary for this part of the lesson.
NOTE: Formatting will erase any material previously recorded on the track.
While the tape is marking the pages, all controls, except the eject key, are inoperative. During this time, explore the surface of the machine to identify these other controls.
The advance bar is located along the top edge of the braille line. Behind the advance bar, on a raised shelf, is a row of five long narrow keys. The left-hand key is oriented from left to right, while the other four are oriented from front to back. The left-hand key is the text back-up control, or "back-up" key, and performs the reverse function of the advance bar. Both are used primarily during reading. The advance bar is used to read forward through braille material, and the back-up key will move backward through the text.
The four long keys to the right of the back-up key will be used to locate different sections of the braille materials on the tape. From left to right, the first key is the "chapter" key, the second is the "page" key, the third is the "paragraph" key, and the fourth (on the right) is the "word" key. Notice that they are arranged from the largest unit to the smallest unit of material. As their names indicate, they will help organize and locate information by chapters, pages, paragraphs, and words.
Just beyond this row of keys are two small round keys side by side. The left key is the "new chapter" key, identified by a raised rectangle under the key, and the right key is the "place indicator" key, identified by a raised diamond underneath. The functions of [hese keys will be explained later in the manual.
Farthest away from you, on [he top right-hand corner of the machine, are two more round keys side by side. The left-hand key is identified by a raised curved line underneathit, and is the "audio selection" key. The right-hand key, with two raised dots below it, is the "braille selection" key. Find these two keys, and the raised marks below them.
Also on the top surface of the machine, in the far left-hand corner beyond the tape cover, is a single key. This is the "eject" button. It is important that you do not press the eject button during the page marking process, or the process will be interrupted and must be begun again.
Finally, at the left front edge, are two slide controls which will be discussed in a later section.
The function of all keys can also be operated by chords. Chords are made by pressing a braille key or keys and the space bar simultaneously. In the following sectionsof this manual, these chords will be set off by (); for example, (b) equals a "b chord" or dots 1-2 and the space bar. This will produce the same function as the backup key.
It is a matter of individual choice as to whether the chord or the key method is preferable.
You should be certain of the names and locations of all of these controls before continuing. A quick reference key to the VersaBraille system's controls is located inside the cover of the unit
The braille cassette will be organized in ways similar to a conventional book. The table of contents is listed separately from the text and contains only the title of the chapters on the tape.
Each time you begin to write a chapter, you must first title it. The word "name" on the braille line is a reminder to do this. The title will automatically be entered in the table of contents, but will not appear on the first page of text.
After you have written your chapter title, tap the advance bar (f) and check the braille line. It will display a full braille cell at the beginning of the line. The rest of the line will be blank. The VersaBraille unit has now moved to the first page of the chapter and is prepared to accept braille as you write on your keyboard.
This full braille cell is the VersaBraille system's writing symbol or cursor. It functions as a stylus or pencil. It automatically appears on the first page when a new chapter is begun. When it appears on the line, as it does now, the VersaBraille unit is activated and ready to write a character in the cell where the cursor is located. The cursor must be on in order to write on any page of text. However, it will never appear in the table of contents.
Before beginning to write, it is important to learn how to deactivate the writing mode. The writing mode is deactivated by turning the cursor off. To turn the cursor off, chord the space key and the dot 5 key on the braille keyboard. (Chording: simultaneouslypress and release braille keys with the space bar.)
The cursor will disappear, leaving the braille line blank. Check the line to confirm this. If the cursor is not gone, it means the keys were not chorded or pressed at the same time. Try again.
Turn the cursor back on by chording the space key with the dot 5 key again. Check to see that the cursor has reappeared on the line. Chording the space key and the dot 5 key will turn the cursor either on or off. You may wish to turn the cursor off and on several times until you become comfortable with the chording technique. You will now be on the first page of the first chapter. Please continue with the instructions for writing.
Best results will be obtained if you read this entire section before beginning to write.
Check to see that the cursor is turned on. If you attempt to write braille when the cursor is turned off, the unit will sound a high-pitched error signal. The cursor must be turned on in order to write.
Use the braille keyboard to write just as you would on a mechanical braille writer. You will find, however, that the electronic keys are sensitive, and you can write with a much lighter touch than before. After becoming accustomed to this sensitive keyboard, you will be able to write with less fatigue and with greater accuracy.
There is no need to change lines with the VersaBraille system, and no need to worry about fitting words in at the ends of lines. The VersaBraille unit does this automatically. You can write without interruption for an entire 1,000-cell page, if you wish.
While becoming accustomed to using this keyboard, however, you may find that you will make errors in writing. Do not use the back-up key or any other to backspace the cursor at this time. Allow the errors to remain as they are written. A later section will explain how to correct them.
When you have written several sentences on page 1 of this chapter, turn off the cursor by chord ing the space key and the dot 5 key.
There are now several sentences on the first page of the first chapter. The rest of the page may be left blank at this lime,
When a full page is written, the VersaBraille unit will signal the approach of the end of the page. A high-pitched tone will sound at cell 900, and a double tone will sound at cell 980. When cell 1,000 is reached a longer tone will sound and you will be unable to write more on that page. Turn the cursor off by chording dot 5 and the space key.
There are two methods for relocating the top of a page:
1. Press the back-up key (b) repeatedly until you hear a high-pitched "pip" signal. The unit will back up through the material line-by-line to the first line on the page.
2. Alternatively, the VersaBraille unit contains a "top-of-page" control. Chord dots 3 and 6 and the space key. This chord will automatically return you to the top of the page.
Reading the text on this page is simple. Read the first line, tap the advance bar, and read the next line. Continue until you have read everything on the page. If you attemptto advance beyond what is written, the high-pitched "pip" will sound, indicating the end of the material written on this page,
Notice that the VersaBraille system never divides words between lines. The unit will display as many words as possible on the line, without division (unless a word is more than 20 characters long).
For practice in reading, back up to the beginning of this page and read it again before continuing. Use either the back-up key or the "top-of-page" chord (dots 3, 6, and the space key) to do this.
NOTE: As the VersaBraille unit changes from page to page, the braille line will display "busy." During these few seconds, the unit is indeed busy, and all keys are inoperative. When the display is no longer "busy," you can continue working.
Whenever a new chapter is begun, the length of the previous chapter is automatically "frozen." Therefore, if you anticipate adding more pages to a chapter at a later time, they must be reserved before beginning the next chapter.
Blank pages may be reserved in a chapter by turning on the cursor, pressing the page key, and then the advance bar for each page to be reserved. They are automatically assigned to the chapter and can be written on at a later time.
Important: In order to continue with these exercises, please be sure that the tape contains at least three chapter titles, with text written in those chapters. At least one of these chapters should contain more than one page. This practice tape will be used during the reading exercises that follow.
When the tape contains three or more chapters, eject the tape by pressing the "eject" (e) key, located beyond the tape cover. Be careful not to hold down the "eject" button. Press it lightly, as you do the other keys. (This is to protect the tape. If the "eject" button is held down for 6 seconds, the tape will eject immediately, without permanently recording new materials or rewinding.) The braille line will display the word "busy" while the VersaBraille unit permanently stores all the braille you have written on the tape, rewinds to the beginning of the tape, and opens the cassette cover.
WARNING: NEVER TURN the VersaBraille UNIT OFF WITHOUT EJECTING THE TAPE. New braille material is not permanently recorded onto the tape until the tape is rewound and ejected. Turning the unit off without ejecting the tape will result in the loss of any newly written material and possibly the table of contents.
Reinsert the practice tape, close the cover, and press the braille selection key. The VersaBraille unit will search the tape for the braille material written on it.
The braille line will display the first title listed in the table of contents. While reading it, be very careful not to accidentally bump the advance bar. If the advance bar is accidentally pushed and the tape begins to spin, eject the tape and begin again.
At the beginning of the line will be the title of the first chapter. At the end of the line will be a series of code letters. The "u" stands for "used," and the number that follows is the number of pages written in that chapter. Remember that the page code system does not use the number sign in order to save space on the braille display. The VersaBraille system automatically keeps this record of the pages used in each chapter.
The second part of the code indicates the number of pages available to make this chapter longer (it does not include pages you have reserved). The "r" stands for "remainingpages available." If the code says "rjjj," it means that there are no pages available to add to the chapter. The length of the chapter is "frozen."
This code of pages used and pages remaining will appear with every chapter title in the table of contents. The pages of each chapter are numbered internally; that is, if the first chapter contains pages 1 and 2, the pages of the second chapter are not number 3and 4. Each chapter's paging system begins with page 1.
The VersaBraille unit always locates the beginning of the table of contents after the braille selection key is pressed. Recall that all chapter titles are located separatelyfrom the text. You must always return to the table of contents in order to read another chapter. Because of the importance of the table of contents, you will learn several ways of using it to locate information.
The chapter titles, as listed in the table of contents, can be read in the following way:
1. Press the chapter key. This is the first long key to the right of the back-up key.
2. Tap the advance bar once. The braille line will instantly show the next chapter title in the table of contents.
To read the next chapter title, repeat both steps (chapter key and advance bar). In this way, you can skim through the titles in the table of contents. When there are no more titles listed, the machine will sound the high-pitched "pip."
You may read backwards through the table of contents by pressing the chapter key and then the back-up key. Repeat both steps (chapter key and then the back-up key) to continuebackward through the table of contents. When you have backed up to the beginning of the table of contents, the high-pitched "pip" will sound again.
Practice reading through the table of contents both forward and backward before continuing.
1. Locate the title of a chapter in the table of contents.
2. Tap the advance bar. The machine will automatically leave the table of contents and search for the first page of text for this chapter. In a few seconds, the machine will display the first line of text. Read through the page by tapping the advance bar after reading each line. If there are errors in the text. it is not necessary to correct them now. Return to them later for correction.
To locate the next page in this chapter, press the page key and advance bar. Turning the page takes approximately 5 seconds.
You can turn back one page at a time within this chapter by pressing the page key and then the back-up key.
When the last page in a chapter is reached, an attempt to advance to the next page will produce a high-pitched "pip." The same signal will sound if you are on the first page of a chapter and attempt to back up another page. In both cases, the boundary of the chapter has been reached.
After reading through the pages of one chapter, the VersaBraille unit will not automatically"turn the page" into the next chapter. This allows you to reread and/or edit; you choose when to turn the page or advance to the next chapter. Move to the next chapter title in the table of contents (chapter key and advance bar), and then into the text (advance bar again). Moving to the next chapter is accomplished within seconds.
NOTE: In order to find a chapter title at random, the chapter title must be written exactly as it is in the table of contents.
The VersaBraille system can instantaneously scan an entire braille page to automaticallylocate any words or characters on the page.
To locate the next occurrence of the word or symbol on that page, press the word key again, and tap the advance bar. Note that it is not necessary to write the word again. The VersaBraille system will always remember the most recent "search-word" entered and will display it on the braille line as a reminder whenever the word key is pushed.
If the word you are searching for does not occur on the page being searched, or if it has been misspelled, the machine will produce a high-pitched "pip" signal, indicating that it cannot locate that word.
You may advance to the next page and continue searching for the same word if you wish, without having to rewrite it. The VersaBraille system will retain the word in its memory until a new word is entered.
The VersaBraille system's word-search function does not require that an entire word be written. An entire word may be found by entering only part of the word on the keyboard(Step 4). To find the name "Columbus," for example, you may write only "Colu" or "um." The VersaBraille search function will be able to locate the full word "Columbus" and any other words with the character string "Colu" or "um."
You have now been introduced to the basic writing and reading functions of the VersaBraillesystem. Be certain that you are able to perform these basic functions without difficulty before continuing to the following material.
The following exercises introduce reading and writing functions which are unique to the VersaBraille system and have not been available previously in conventional paper braille reading and writing.
The VersaBraille system does not show paragraphs by the usual paper braille method of changing lines and indenting two cells. Instead, the VersaBraille unit uses a special symbol to indicate the start of a new paragraph. This symbol is edp (ed sign followed by the letter p). This is a symbol that has no meaning in the literary braille code and will always indicate the beginningof a new paragraph in the VersaBraille system.
Begin a new chapter on the practice tape, perhaps title it "Paragraphs." Tap the advance bar to begin the first page. Begin the page with a paragraph symbol in the following way:
On the page on which you have written paragraph symbols, you can skim through the text paragraph by paragraph, locating the first line of each new paragraph.
You have seen that from the table of contents, the first page of a chapter is locatedby simply tapping the advance bar. You may then turn to the next page by pressing the page key and then the advance bar.
However, any paqe can be directly located within a chapter. First, locate in the table of contents the title of a chapter that has more than one page. Then:
This process will operate from any place within the chapter. If you are on page 5, and want to go to page 8, or to page 2, for example, the process is exactly the same. Practice this method of changing pages before continuing.
The VersaBraille system can instantaneously scan an entire braille page to automaticallylocate any words or characters on the page.
To locate the next occurrence of the word or symbol on that page, press the word key again, and tap the advance bar. Note that it is not necessary to write the word again. The VersaBraille system will always remember the most recent "search-word" entered and will display it on the braille line as a reminder whenever the word key is pushed.
If the word you are searching for does not occur on the page being searched, or if it has been misspelled, the machine will produce a high-pitched "pip" signal, indicating that it cannot locate that word.
You may advance to the next page and continue searching for the same word if you wish, without having to rewrite it. The VersaBraille system will retain the word in its memory until a new word is entered.
While writing a braille page, you might wish to leave some blank space for additions. You can determine how much space on the page has already been used by using the "place indicator" key (I). This is the small round key to the right of the new chapter key and is identified by a diamond-shaped tactile symbol below the key.
The place indicator key also functions in the reading mode. In that case, the characternumber (ch) is always the number of the first cell of the line you are reading.
The VersaBraille system's editing capabilities bring an entirely new dimension to the use of braille. Braille can now be corrected, erased, or added to, without disruptingany remaining text.
All the editing functions described in the following sections use the braille keys, but require chording the braille keys with the space key, or pressing a braille key and the space key at the same time. It is important to avoid accidently bumping the space key or the braille keys, or pressing them without chording during the editing process, as this will result in rewriting the braille with spaces or extra dots.
While working through the following editing instructions, you will find that each braille key, when pressed with the space key, operates an editing feature. Below the braille keys are raised markings, designed as aids in remembering the editing functions of each key.
Under the dot 1 key is an arrow pointing to the right, and under the dot 2 key is an arrow pointing to the left. These indicate the direction the cursor may be moved across the line.
A horizontal line, or the print "minus" sign, is under the dot 3 key. This represents the "delete" function of the VersaBraille system which will subtract material from the text.
The dot 4 key will write the paragraph symbol when chorded, as demonstrated in a previous section, Its tactile symbol represents an indentation of text.
Under the dot 5 key is a raised cursor symbol. Recall that this key, when chorded with the space key, turns the cursor on or off.
Two intersecting lines, or the print "plus" sign, is under the dot 6 key. This represents the "insert" function, which will add material to the text.
Review these tactile indicators while working through the following editing exercises.
The editing of any braille text requires the use of the cursor. It is important to be able to move the cursor freely across the braille line before beginning to edit.
Practice moving the cursor to the right and the left. If the keys are not released simultaneously, you might either erase information you want or add dots or spaces you don't want. You should be able to move the cursor freely and confidently without error before continuing with the editing instructions.
NOTE: If the advance bar or back-up key is pressed while the cursor is on, the text will advance or back-up one line and cursor will appear in the first cell of the display. No information will be lost or changed.
An error which involves only one cell, requiring a simple strikeover of the mistaken character, can be easily corrected.
Practice this error correction process by correcting other single-cell errors on the tape.
The ability to delete braille material, as it exists in the VersaBraille system, is a new concept in braille writing. If portions of braille material are removed from the middle of the text on a page, the VersaBraille system does not leave empty spaces. The text that follows the deleted portion on the page is automatically moved over to fill up the space. The VersaBraille system is able to instantaneously delete single characters, whole words, and portions of or entire paragraphs, pages, or chapters.
If a word in the text contains an extra character, while the rest of the text is written correctly, the mistaken character may easily be "lifted out." It is not necessary to re-write the rest of the word.
The VersaBraille system can delete whole words at once, without leaving spaces in the text.
NOTE: The VersaBraille system defines a "word" as "any string of characters followed by a space." Also, a space alone is considered a "word." Within this framework, therefore, punctuation associated with a deleted word will also be deleted. If the contracted words "to," "into," and "by" are attached to the deleted word, they will also be deleted.
An entire paragraph or a portion of a paragraph may be deleted with the VersaBraille system.
Any portion of a page may be deleted in a manner similar to deleting paragraphs.
An entire chapter can be deleted from a VersaBraille cassette tape by erasing the title from the table of contents.
NOTE: It should be apparent that "chapter delete" is a process that could erase a large amount of information with extreme ease. Therefore, it is advisable to be doubly sure that the chapter you are deleting is, in fact, the chapter you do not want.
Within a braille page, it is possible lo insert new material in the middle of text already written, without disturbing the original text. The VersaBraille system is able to spread sections of text apart, to make room for new material on the page. This new material can be added to a page until the page is filled. Attempts to continue adding material after "page full" warning will cause new characters to be written over old ones.
To insert more than one character, follow Steps 2-6 and continue writing until everything has been inserted.
The VersaBraille system will allow you to insert new material until the page is filled to it's 1,000 cell limit or until you press another chord (e.g., to move the cursor, turn the cursor off, chord the paragraph symbol). Therefore, if you wish to insert the paragraph symbol, do not use the one-stroke "paragraph" chord to write it. Write in the symbol manually, with a space on either side (edp).
It is possible to change or rewrite the title of any chapter in the table of contents. Because the cursor never appears in the table of contents page, however, this process does not use the cursor symbol.
NOTE: An audio "error" signal indicates you have written a chapter name that is already in the table of contents.
With the VersaBraille system, it is possible to write braille and record audio information on the same cassette. The audio information is recorded on the second track of the cassette. In this case, a C-60 cassette tape has a total capacity of 200 pages on the braille track and approximately 30 minutes of indexed audio recording on the audio track. Do not turn the tape over to use the second side because if braille and audio are mixed on a single tape, there will not be a "second side" available.
The following table helps to clarify the cassette storage capability of the VersaBraille system:
Sides of Braille Recorded Audio Recorded Tape Available
Yes No Two Yes Yes One No Yes Two
Titles for audio sections can be listed in the table of contents with other chapter titles. The VersaBraille system will automatically locate these audio sections, just as it does the braille chapters. It is not necessary to use the fast forward and rewind functions to locate audio recordings if they are listed in the table of contents.
The audio function is controlled as an overlay and is one of four overlays provided with this model VersaBraille. The overlays are stored as chapters on the Master Overlay Cassette shipped with this unit.
To load the audio overlay:
The VersaBraille system will now function as an audio unit. The braille line will display the name of the audio function currently operating (stop, play, record, fast forward, or rewind). The number following "count" is part of the tactile tape counter, which records the movement of the tape in the audio mode.
In the audio mode, the six braille keys function as audio control keys. Tactile markings above the keys help identify their audio functions.
The space bar is not used in audio mode. There are no chords.
In the left front corner of the unit are two slide levers which operate in the audio mode. The left lever controls the tape speed. The right lever controls both the volume of audio playback and the audio signals in the braille mode. Sliding the levers away from you increases the speed and volume when the unit is in audio mode, as indicated by the raised arrow between the levers. The left lever (speed control) has a detent (click stop) at its central position which sets the speed at 1 - 7/8 ips. This lever should be set at the central position before recording.
To avoid recording over and erasing previously recorded, indexed audio material, the following procedure is recommended:
Later, to begin recording an audio section at the space that was reserved, follow these steps:
1 - 4 from the section above.
NOTE: If the above procedure for sequentially recording audio chapters is not followed, it may result in new audio material being accidentally recorded over (and erasing) old audio material.
To read the braille title, press the braille selection key. The VersaBraille unit will return to the table of contents and display the title of the audio chapter just played.
To play any indexed audio chapter, locate the title in the table of contents and follow Steps 2-5 above.
After the audio overlay has been loaded, the VersaBraille unit may be used solely as an audio recorder/player. In this mode, each side of the cassette will record 30 minutes of audio, or a total of 60 minutes of recording time at 1 - 7/8 ips. To use both tracks of the cassette for audio recording as in standard tape recording, you must turn the tape over. In the audio-only mode, the VersaBraille unit cannot write any braille or index the audio sections. In the audio-only mode, do not use formatted tapes or tapes with braille on them, as you can record over and therefore erase braille material.
The VersaBraille unit contains a built-in microphone and speaker for recording and playback of audio tapes. A remote microphone and earphone may be attached to the rear control panel.
The variable speed control for audio playback is a slide switch in the front left corner of the unit. Its speed range is 3 - 3/4 inches per second to 15/16 inches per second, with a detent (click stop) midway, at I - 7/8 inches per second.
The volume control is a slide switch to the right of the speed control. Increase the volume by pushing the switch away from you.
The tape counter begins a tape at 000 and counts to the end of the tape at 999. It will be useful for approximating locations of audio sections. For example, if a particular recording begins at count 470, it can be located by monitoring the tape counter while the tape is moved forward or rewound.
In the "play" and "record" modes, the counter increases by single digits. In the fast forward and fast rewind modes, the tape moves too rapidly to monitor single digit increases and registers, instead, by tens. It can be reset at 000 at any time by pressing the dot 6 key.
Audio tapes recorded on the VersaBraille unit may be played on other tape players. Audio tapes recorded on other units may be played on the VersaBraille system.
The second tape included with the VersaBraille system is a sample of materials called the Pocket Organizer. Its purpose is to demonstrate a variety of ways of organizing directories, calendars, files, etc.
When you are thoroughly familiar with all the reading functions of the VersaBraille system, insert side A of the Pocket Organizer tape.
After pressing the braille key, you will get the first title in the Table of Contents. This title, "Overlay", is for the Audio Overlay. Load it by pressing the advance bar. When the overlay is loaded, the display will read "stop". The VersaBraille thinks it is an audio tape recorder and is ready to play.
Return to the braille Table of Contents by pressing the braille key. You must get back into braille mode to access chapters from the Table of Contents. The original title will again be displayed. Advance to the second title, "Audio". The dot 3 in the first cell denotes an audio chapter advance into the chapter with the space bar and play the tape with the dot 4 ("go") key (as explained in the previous indexed Audio section).
There is a half hour of audio information explaining the Pocket Organizer cassette. At any time you can stop the audio (dot 5), press the braille key and return to the braille Table of Contents to access the many chapters included in the organizer.
This has been created not only to show you the many ways of organizing personal and business information, but to let you have a permanent pocket organizer. After reviewing the tape, you may delete the Audio Overlay and Audio Chapter and format side B for additional personal or professional files.
Advance to the second chapter tape. The second and third chapters on the sample tape are examples of calendar organization. The chapter titles are the names of the months.
Notice that "May" contains 31 pages. The chapter is organized with each page containing one day's activities. You can read the schedule for a certain day by requesting the corresponding page number. For example, to read the schedule for May 7, locate page 7 of Chapter "May" on the cassette. Locate the schedule for May 7, and then continue reading the manual.
The activities for May 7 in this example are listed first by time and then by activity.
Locating a specific appointment on May 7 is a simple process. Using the random word search feature, you can search for a specific name or time of day. You can even skim all the appointments for the day by repeatedly searching for we number sign appearing before each time. Use the search function to find the examples.
In the next example, the chapter title is the month of June. It contains four pages, which correspond to the four weeks of that month, rather than single days. This method may be more practical for those with less busy schedules.
Locate the schedule for the third week of June, or page 3. The specific days of the week can be located using we search function.
As an alternative, you might begin each day with a paragraph symbol, and then locate each day using the "paragraph-advance" function. Practice these methods of locating information. /
In the table of contents, locate the chapter entitled "Phone." This chapter contains a personal phone directory consisting of 26 pages, with one page for each letter of we alphabet. With this system of organization, you may locate John Smith's phone number by requesting page 19 (the S page). When the page is found, enter his name in the search mode.
Practice locating various pages and names in this manner.
VersaBraille system users who have extensive files on client, customer, or business contacts may find the next chapter useful as an example of how this type of information can be organized. The name of the client or customer is used as the chapter title. Personal information, phone messages, appointments, or other contacts with the person may be written on the pages in each individual chapter.
Cassette tapes may be protected against additional writing or recording by removing the plastic tabs on the back of the cassette. When a record protected tape is inserted in the VersaBraille unit, the braille line will display "select and, brl" and will not include the choice "for" for formatting.
A protected tape cannot be altered in either the audio or braille modes. When using a protected tape in the braille mode, the cursor cannot be turned on. A low-pitched error signal will sound. In the audio mode, the record control will not operate.
On rare occasions, a flaw in the tape may cause a loss of material. The VersaBraille unit will search the tape in an attempt to locate requested material. If the text cannot be located because of tape or recording quality, a high-pitched error signal will sound, and the braille line will display "bad tape" or "bad page." This tape or a section of it may no longer be reliable.
A triple high-pitched error signal indicates a defect within the page itself. Read the page and rewrite any material which contains errors.
If a tape is inserted which has not been formatted, and the braille selection key is pushed, the VersaBraille will search the tape (for approximately one minute) and then eject the cassette.
When the battery charger is plugged in and there is a power failure or a substantial increase or decrease of power, any new chapters or pages added to present chapters will be lost. Therefore, from time to time, it is advisable to eject the tape from the VersaBraille system. This will insure that all new data will be saved and the Table of Contents will be updated.
The VersaBraille unit can delete material in units of characters, words, paragraphs, pages, and chapters. In this process, the paragraphs and pages are deleted to the end of the specified unit.
If the material to be deleted occurs in the middle of the paragraph or page, but you wish to retain the last part of the paragraph or page, do not use the page-delete or paragraph-delete function the normal way. The word-delete functions may be too time-consuming if the passage is long.
The material may be deleted in the following way:
This can delete any number of sequential sentences which do not constitute an entire paragraph or page. For example:
In the following paragraph, the middle sentence will be deleted:
The United States of America is a large country. It is bounded on the east by the Atlantic Ocean and on the west by the Pacific Ocean. The continental United States is divided into 49 states and is approximately 3,000 miles wide.
The United States of America is a large country. edp It is bounded on the east by the Atlantic Ocean and on the west by the Pacific Ocean. edp The continental United States is divided into 49 states and is approximately 3,000 miles wide.
The United States of America is a large country. The continental United States is divided into 49 states and is approximately 3,000 miles wide.
Customarily, for writing and editing purposes, the cursor is moved across a line cell-by-cell by using the appropriate chord.
Alternatively, you can move the words on the display line to the left, one word at a time, until the word you wish to edit appears at the beginning of the line:
The cursor can also be moved to the left or right by using the word function key with either the advance bar or back-up key.
NOTE: When the machine is turned on, a space is already present as the search word.